Keep your listings up to date
What updates by itself, what you can change, your own booking link, and how to hide or remove a listing.
We check your platform's page again regularly, and you can change most things that are wrong yourself. Here's what does what.
What updates by itself
- Cancelled on your platform? If its page there says it's cancelled, your listing says Cancelled too and leaves One Ticket's events pages. If you delete the event there or make it private, we can't read it any more: hide or remove the listing yourself.
- A listing we made for you also takes a new date or time for a one-off event, new and finished sessions for an event with many, and a new price range ("From $35"), as your platform's page changes.
Once you or we save any change to a listing here (its words, photo, booking link, or hiding it all count), its dates, times and prices stay as saved: your changes always win. An event you list yourself counts as saved by you from the start. So if a date or time changes later, change it here too. For a new price, contact us and we'll update it.
Open your listing
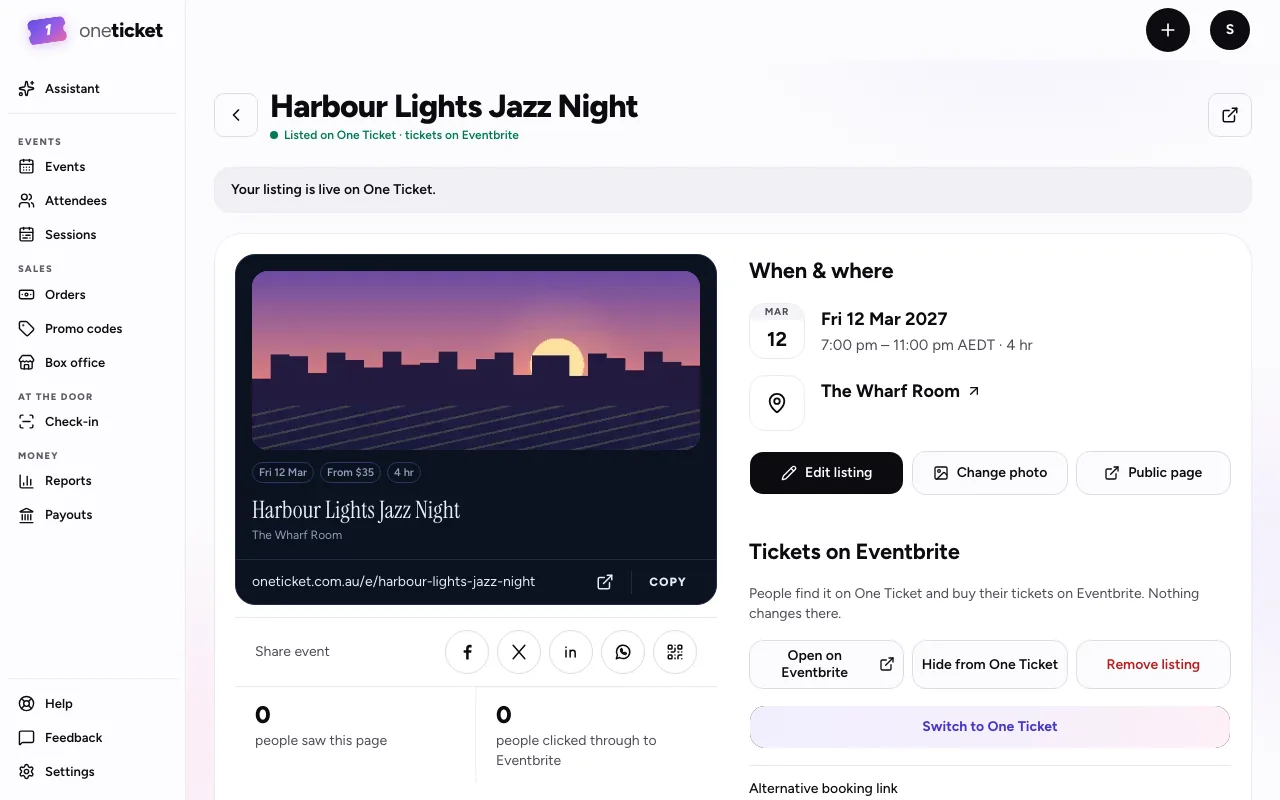
Go to Events and choose the listing. It says "Listing · tickets on Eventbrite" (or wherever you sell). Its page shows your listing as people see it, its link to share, and how many people saw it and clicked through to book.
Change what it says
- On the listing's page, choose Edit listing. It opens in the editor, with Selling on Eventbrite (or your platform) picked at the top.
- Change its name, its description under About, the date and times, or the place. Change the cover photo, or add more under Photos.
- Choose Save.
The price range comes from your platform, under Tickets on Eventbrite: choose it to open your event there.
Your page's theme, colours, font and motion come with selling on One Ticket. While the tickets are on your platform, the listing keeps its look, with colours matched to its photo.
Send people to a different booking page
Take bookings on FareHarbor, Rezdy, Bookeo, Checkfront, TryBooking, WeTeachMe or TicketHost? Paste that page into Alternative booking link on the listing's page (or under Tickets on Eventbrite in the editor) and choose Save. The button becomes Book on FareHarbor (or the one you use). Empty it to send people to your platform again.
Hide it or take it down
On the listing's page:
- Hide from One Ticket takes it off One Ticket for now: its page says it isn't available. Show on One Ticket puts it back.
- Remove listing takes it off One Ticket for good. Choose Remove to confirm.
Neither changes anything on your platform, and you can list the event again later.
No account yet? Use Not right? Remove it on the page our email's View your listing link opens, or reply to our email and we'll take it down.
Still stuck? Contact support and a person will get back to you.